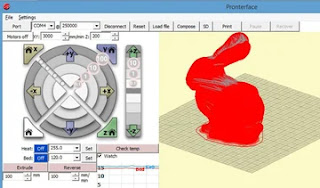
Como instalar o Printrun / Pronterface no Ubuntu 18.04
Atenção: Esse tutorial foi testado nas distribuições anteriores ao Ubuntu 18.04 e não funcionaram. Aparentemente devido as distribuições anteriores não terem atualizado seus repositórios dos pacotes Python, principalmente Python3.
1º Você irá acessar o projeto Printrun no github:
https://github.com/kliment/Printrun
2º Irá clicar em clonar projeto e baixar como .zip

3º Irá instalar todas as dependências pelo terminal:
sudo apt install python3-pip
pip3 install --user pyglet
sudo apt install python3-serial python3-numpy cython3 python3-libxml2 python3-gi python3-dbus python3-psutil python3-cairosvg libpython3-dev python3-appdirs python3-wxgtk4.0
4º Abrir a pasta 'Printrun' que você baixou e depois com o botão direito do mouse, ir em 'abrir no terminal'

5º Após isso, basta executar no terminal o seguinte comando e pronto!
python3 ./pronterface.py
6º Se preferir pode fazer tudo pelo terminal, desde abrir a paste e depois executar o programa:
cd Printrun
python3 ./pronterface.py


Comentários
Postar um comentário